Sunday, October 30, 2011

A spooky Halloween party

A Halloween party in Salem, MA is always a treat, especially when you work with incredibly amazing clients. h&a happenings helped plan and design an event at a private residence near downtown Salem last night, and the end result was spooktacular. The vibe was creepy deserted house - think the attic of an old Victorian mansion aka Stephen King style - with furniture covered in white sheets, old black and white photos on display, lots of candles, and super eerie baby dolls that really just want to be hugged one more time. And thankfully the crazy weather didn't force all the guests to stay off the road. The brave souls that were up for the weather challenge were also more than up for the shuddersome scene awaiting them at the Streeter house.

A very big thank you to Erin and Michael Streeter for giving me the opportunity to transform their home into a macabre setting!


venue: private residence
planning & design: h&a happenings
photography: h&a happenings

Friday, October 28, 2011

Halloween party prep - pickled brains

It's the weekend of Halloween parties!! I'll be spending all day tomorrow setting up for what is sure to be a kick-ass party right near downtown Salem (you can't get more festive than that, right?). One of my projects today is pickled brains, which is super easy and totally creepy (and edible!):


Ingredients:
1 cup red-wine vinegar
3 cups white-wine vinegar
1 cup sugar
1/2 cup salt
1 tablespoon black peppercorns
1 tablespoon brown mustard seeds
5 or 6 red pearl onions
2 to 3 heads cauliflower

Directions:
1.Place cauliflower in a large glass heatproof jar or canister, positioning florets against the glass; set aside.
2.Fill a large pot with 8 cups water. Add both vinegars, sugar, salt, peppercorns, mustard seeds, and onions. Bring to a boil.
3.Carefully pour boiling liquid over cauliflower; let cool to room temperature. Cover and transfer to refrigerator. Let chill overnight or up to 1 week.

Serves 8 to 10 as hors d'oeuvres 

[Image and recipe via Martha Stewart]

Monday, October 24, 2011

DIY party favor: s'mores on a stick

Planning a fall party or a maybe a camping themed event (or maybe you're just hungry for s'mores)? Elizabeth Anne Designs has a step by step guide on how to make s'mores on a stick, along with packaging them in a super cute package. Even better? The ingredients are simple and the instructions are easy! Check it out here.


Wednesday, October 19, 2011

DIY wood stools


I teased you guys with this DIY project last week, and these stocky guys were not only easy to make, but they were a huge hit with all the wedding guests.  So much so that we had several guests putting dibs on wanting to take them home after all was said and done.

What you'll need:
  • 12 solid wood stumps big enough to hold one person (we used oak that was roughly 14" in diameter) 
  • Drill with a 1/4" wood drill bit
  • Plywood to create the base of the cushion (my friend Aaron had a bunch of plywood laying around that was leftover from other house projects, in all different shapes and thickness, which he then cut into 12" circles; but you can go to Home Depot and buy sheets of plywood in your desired thickness)
  • Wood saw
  • 12 2" X 1/4" lag bolts, 1/4" nuts and 12 washers 
  • 3/8" Staple gun
  • Cotton batting (we had a five pound box of cotton batting on hand that we used at our discretion)
  • 12 cuts of fabric in 14" X 14"squares (weather proof fabric is ideal)
  • Protective eye-ware  
  • Pencil
  • Drafting compass
  • Pliers or monkey wrench (for tightening nuts and washers)
Directions:

Always wear your protective eye-ware when doing any sawing or cutting projects!

Take plywood and using your compass, trace a 12" circle, then cut with a wood saw.  You'll need 12 of these.

Using a drill with a 1/4" drill bit, drill center of each  piece of wood then insert lag bolt into what will be the top of seat. On the bottom, place washer on lag bolt and tighten nut securely in each wood base.

Lay out a piece of fabric face down on work bench or table. Take one of the 12" wood bases and lay so that the lag bolt is facing up.

Using the staple gun, pull fabric toward you and staple to the bottom of the wood base, leaving one small section open / un-stapled.

Take cotton batting and begin stuffing the batting into the open hole, making a cushioned seat. Once you get it to your desired thickness, lay the cushion face down and pull the open ends of fabric toward you and staple to the bottom of the base.

Repeat with all remaining cushion bases. Once they have all been assembled into cushions, take your drill and 1/4" drill bit and drill holes into the top of each wood stump. Brush off wood shards and then take each cushion and affix lag bolt-side down on top of each stump.  Voila!  And if you want, you can paint or stain each stool (before affixing the cushion, of course) with weatherized paint or stain so that you can leave these guys outside year-round.

A HUGE thanks to my best friend, Aaron Martin, for all his help and creative vision with these stools.


Tuesday, October 18, 2011

A moody autumn afternoon

I absolutely love moody autumn days. Y'know, when the sun is struggling to shine through the stampede of clouds filling the sky, and there's that ominous feeling of a rain storm. The smell of fall seems the most vibrant at these times. I took a stroll through my neighborhood this afternoon and captured the following with my iPhone:


Online flea market

Ok, so flea market is stretching it a bit, but Three Potato Four is an online store that showcases some seriously amazing stuff. A lot of it is antique and vintage, so the price tags can be pretty hefty, but there are so many things that I want to buy RIGHT NOW! Click on the image to shop that item online.

I'm a little obsessed with old doors and converting them into amazeballs coffee tables, shelves, or using as standalone with a super sassy mirror affixed to the top portion where the open window is.


And how great would this look in your backyard beer garden?


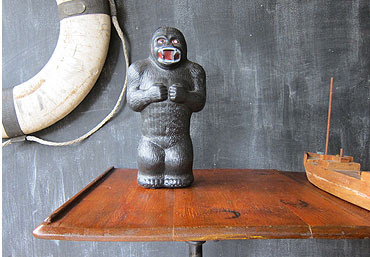
This King Kong coin bank is from the 1960's. Fill it with coins and then use it as a book end.


This farm table is nearly identical to one I found at Todd Farm's flea market this past summer, and we used it as the gift table at a bridal shower.


These photo clip stands would work perfectly as labels of food stations at a party.


Friday, October 14, 2011

DIY cake stands

One thing that should always be a staple at any party are cake stands. They are soooo not just for cakes! I use cakes stands for everything. I stack them to make a tiered stand to fill with cupcakes, cookies, appetizers, or gifts. I decorate them with gourds, Christmas ornaments, wildflowers, potted plants, and candles. Or use them in your kitchen to hold spices and oils, or in your bathroom to hold perfume, jewelry, or make-up. 


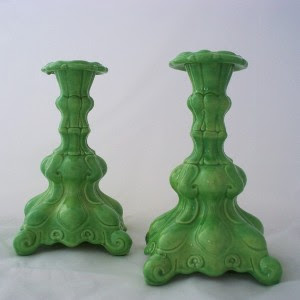
The one downfall to cake stands is that they are so very often a bit pricey. So, why not make your own? It's so easy it's ridiculous. And by making your own you can add your own personal style. Me, I absolutely love vintage anything, but you can use any plates and candlesticks you like. Just make sure the candlesticks are sturdy (tall skinny ones won't work that great). Search Etsy or local antique / thrift shops for some plates and glass candlesticks, and once you have found some favorites simply glue the two together with some Loctite glass glue, which you can pick up from Home Depot.  Leave the stands upside down for 24 hours for them to completely seal and dry.  It's THAT simple.

 
It's as easy as 1, 2, 3:

 +
 +


Top images via The Martha Blog and Design Sponge
Bottom plate image via 1StopRetroShop.com 

Your one stop shop for all things Halloween

Halloween is only two weeks away and I know a lot of you are planning parties. Whether it's a costume party or just a fun pumpkin carving event for your kids, grandin road is sure to have everything you could ever want for decorations and spooky decor. A few of my favorites are below. Click on the pics to shop that item online.

Cocoon Man ($49) and set of three Halloween spider larva balls ($29):


Animated haunted magic mirror ($79):


Martha Stewart black & white ceramic pumpkins ($24 a piece):

Creepy crawly Halloween streamer panel ($15):


 Halloween table linens $29-$69):


Black candle path markers ($15):

Thursday, October 13, 2011

New spin on a boutonnière

For my September wedding I wanted to do things different than the usual traditional "stuff". And I wanted to add my own personal touch to, well, everything. I'd like to think I succeeded on all levels, and one thing that I absolutely loved was foregoing the usual flower boutonnière for a custom designed (and hand crafted) wood broach from Zime Illustrations

I stumbled onto Zime's Etsy page because I was searching for something else (what that was I can't remember) and then I saw the I Love My Spring Mustache broaches and knew immediately that this is what I wanted for the boutonnières. I sent Zime an email, heard back from them almost instantaneously, and what was even more amazing is they offered to match the colors of the broaches to the colors of my wedding - for no extra cost.

The final result was perfection.


photographer: zime, courtney joe schoenbaechler
planning & design: h&a happenings

Camping baby shower

I'm so in love with this baby shower from Jesi Haack Design. From the outfit the mom-to-be is wearing to the make your own onesie to the amazing dessert bar. Click here for all the details and to see the other pics.


A new twist on mac n cheese

The days are getting shorter and the evenings are getting cooler, and you know what that means: cravings for stews, soups, and comfort food. I love trying out new recipes in the fall, mostly because it's my favorite time of year to cook. I recently made a dish that was a huge hit at a fall inspired backyard party - Croque Monsieur mac n cheese. It took a while to prep (chopping and grating the cheese), but the outcome was well worth it.


Ingredients:

* 1/2 pound ziti
* 2 cups milk (I used fat free)
* 2 cups coarsely grated Gruyere cheese (about 6 ounces)
* 1 cup finely grated Parmesan cheese (about 4 ounces)
* 2 large eggs
* 3 slices wheat sandwich bread, roughly diced
* 2 tablespoons unsalted butter, plus more for greasing (instead of using butter for greasing, I used Pam)
* 1 medium onion, diced
* 1 clove garlic, minced
* 3 tablespoons all-purpose flour
* Pinch of cayenne pepper
* 1/8 teaspoon freshly grated nutmeg
* Kosher salt
* 8 ounces thinly sliced deli-boiled ham

Directions:

Preheat the oven to 425 degrees. Bring a large pot of salted water to a boil. Add the ziti and cook until al dente, about 6 minutes. Drain and transfer to a large bowl; toss with 1/4 cup milk.

Meanwhile, combine both cheeses in a bowl. Beat 1/4 cup milk and the eggs in another bowl; fold in the bread and add half of the cheese.

Melt the butter in a saucepan over high heat. Add the onion and garlic; cook, stirring, until just brown, 2 minutes. Sprinkle in the flour, cayenne, nutmeg and 1 teaspoon Kosher salt; cook, stirring, about 2 minutes. Slowly add 3/4 cup water and the remaining 1 1/2 cups milk; bring to a boil, stirring until thickened. Remove from the heat and whisk to cool slightly. Whisk in the remaining cheese, then add the pasta and toss.

Butter a shallow casserole dish. Add half of the pasta, top with some of the ham and cover with the remaining pasta. Top with the remaining ham, then cover with the bread mixture. Bake until golden and bubbly, about 20 minutes. Let rest a few minutes before serving.  


Recipe courtesy Food Network Magazine
photography: heather anderson

Wednesday, October 12, 2011

Sneak peak: rustic Maine wedding


The night before the day-of festivities, guests milled about the venue (140 acres all to themselves!), sipping a few drinks and catching up with friends they hadn't seen in a while. This tree, which the photographer captured as if it were lit from within, became the focal point of the weekend.

photographer: jeffery harmon photography
planning & design: h&a happenings

Mini polenta pizzas


I made these little guys for a little impromptu fall gathering and they went like, well, mini pizzas. Not only were they delicious, but they were super easy to make. Just buy a couple of tubes of prepared polenta (I prefer the organic brand at Whole Foods), a couple of jars of spaghetti sauce (I used garlic and herb), and a large bag of shredded mozzarella cheese (normally I would use fresh mozzarella but I didn't have any on hand).  I kept the ingredients simple, but you can definitely add any other toppings, just keep in mind that these pizzas are very mini so it's better not to overdo it.

Preheat oven to 350 degrees and slice the polenta into about 1/3” rounds and then layer with your ingredients. Sprinkle with fresh ground pepper.  Assemble on a cookie sheet (I used a silpat, but you can just spray a cookie sheet with Pam or even oil) and cook for approximately 30 minutes.  

Tennis court wedding reception

I sadly can't remember where I found this picture, but when I stumbled on it I immediately thought how incredibly creative it was. If you're a tennis nut, what a great venue for an active wedding reception.


#1 accessory to being organized: a killer bag

Planning events means that I usually end up having a lot to carry. I've got a binder for everything and will often carry three or four along to visit a client. I also have other necessities that have to trek everywhere with me, so I need a reliable and durable bag, but I don't just want any bag. I have a bit of an obsession with bags to begin with, and I often gravitate toward styles that I can't afford. But, I finally caved and bought one that I'd been stalking for a while, the La Tropézienne by Clare Vivier. I've had this bag for a little over a year now and I'm still using it as my everyday bag. It's roomy and gorgeous and as it gets more use, it gets more gorgeous. Now I'm obsessing about her oversize clutch.


Being organized is key

I'm definitely a slave to organization.  Well, in most areas of my life.  I have a tendency to let my books and clothes pile up in my bedroom.  I often try on a few different outfits each morning, and when I discard an item, it usually lands on the chest at the foot of my bed.  My books, on the other hand, usually end up, well, everywhere.  I love reading and I hate giving up a book, so all my bookshelves are stuffed to the gills.  So, that leaves the floor and I have many piles all over my house.  One Sunday afternoon I was attempting to tidy up the piles that had accumulated in my bedroom and my cat, Ralphie, decided he was going to help me.